根据上一篇的内容,尝试运用卷积的原理进行图像边缘检测。根据其原理,先确定一个卷积核,并以卷积核的维度确定一个窗口,计算窗口和原图像的元素积。最后移动窗口进行迭代,得到卷积后的图像。
实现
具体代码如下:
1
2
3
4
5
6
7
8
9
10
11
12
13
14
15
16
17
18
19
20
21
22
23
24
25
26
27
28
29
30
31
32
33
34
35
36
37
38
39
40
41
42
43
44
45
46
47
# coding = utf-8
"""
实现不同卷积核对图像的卷积操作,并输出图像结果。
"""
import cv2
import time
import numpy as np
# 定义卷积核
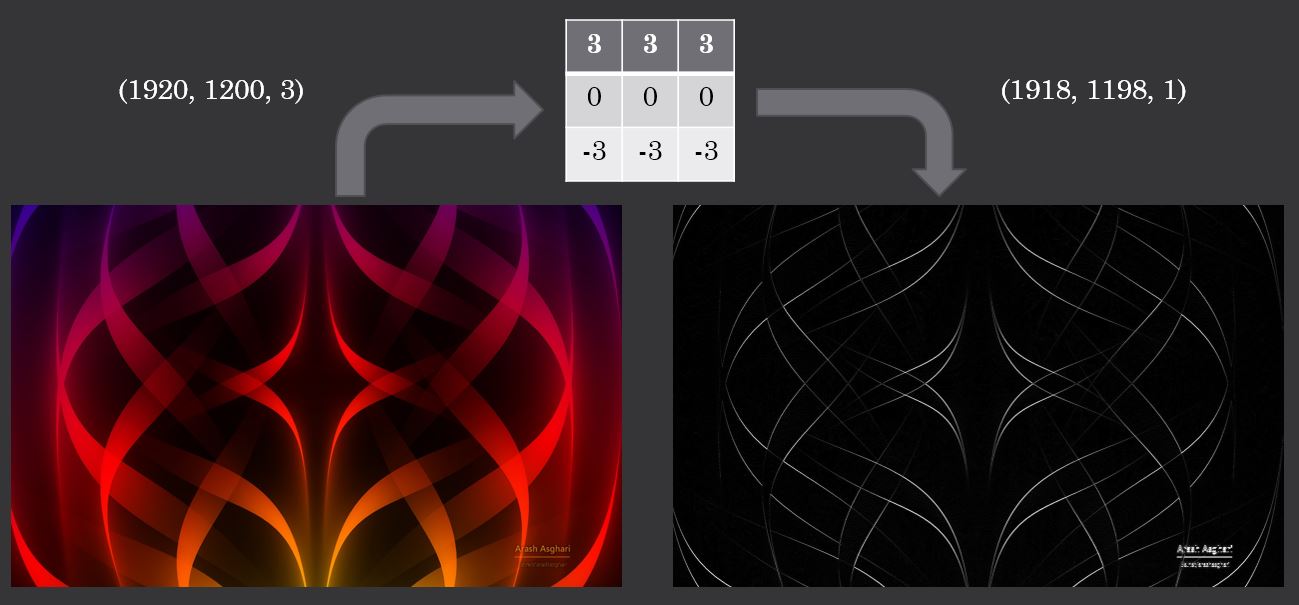
conv_kernel = np.array([[3,3,3], [0,0,0], [-3,-3,-3]]) #水平边缘检测器
# conv_kernel = conv_kernel.T
def img_conv(img, conv_kernel = conv_kernel):
# 卷积核大小、img大小、输出大小
f = conv_kernel.shape[0]
n1, n2 = img.shape
output = (n1-f+1, n2-f+1)
# 计算元素积
sum_product = lambda arr1, arr2: np.sum(arr1 * arr2)
# 计步、取移动窗口,保存到result
windows = []
for s1 in range(output[0]):
# 初始化移动窗口
for s2 in range(output[1]):
window = np.random.randn(f, f)
for i in range(f):
for j in range(f):
window[i][j] = img[i+s1][j+s2]
windows.append(window)
# 计算元素积并生成结果
results = []
for win in windows:
results.append(sum_product(conv_kernel, win))
result = np.array(results).reshape(output[0], output[1])
return np.abs(result)
def gray_proc(img):
'''灰度化,直接用均值'''
return np.mean(img, axis=2)
if __name__ == "__main__":
start = time.time()
img = cv2.imread("./test.jpg")
output = img_conv(img=gray_proc(img))
cv2.imwrite("./output.jpg", output)
print(f"图像尺寸为:{img.shape}\n共耗时:{time.time() - start}秒")
得到结果如下:
总结
从结果可以看到卷积运算成功的描绘出了图像中存在的边缘变化,并且由于卷积核为水平检测,得到的输出图像中偏向水平方向的边缘比垂直方向的边缘更加明显。
本例由于没有对迭代过程进行向量化操作,运行时间偏长。对于 1920*1080 分辨率的图片,处理时间大概为一分钟,有很大的优化空间。在 Python 的 Scipy 和 Numpy 中集成了更加高效的函数可以直接处理,本例只作为理解卷积原理的练习。